Sunday, August 30, 2015

Rainbow Pancakes

Last month, we had Alex's niece Charlotte over for the night.  I was excited to have a 3-year-old in the house to cook fun things for, so I got up early (really early... kids don't sleep late, do they?) and took charge.  I decided that rainbow pancakes would be awesome.  The idea came to me somehow, and I did a quick search to find this post from I am Baker.  It's a good one to check out because it's full of tips for making good rainbow pancakes, including:

  • Don't use butter, because it browns the pancakes, and you want the pancakes to be colored like a rainbow.  If one side gets overly browned, it's okay; just serve that one brown-side-down!
  • Have a lot of bowls ready, because each color is going to need its own.  I got lazy and only made four colors, but even still there were a lot of dishes!
Honestly there was more to making rainbow pancakes than I thought, so I was glad I read the post all the way through!  It was a lot of fun to try these out - and then fun for Rachael and I to eat them.  These are obviously not just for kids!  :)  I even got wild and mixed colors for a tie dye pancake at one point, but it got a little too burned so you don't get a picture of that one.

Charlotte claimed some colors tasted better than others, but I promise they're all the same :)  This is just a basic pancake recipe, but the batter is thin to help them cook quickly and thus avoid getting brown.  They still puff up nicely with the hefty dose of baking powder.

No more cute breakfasts after today... back to work in the morning.  I know I shouldn't complain because I had the summer off, and many teachers already went back last week, but still.  Complain I will!

Recipe:

rainbow pancakes
serves 4

Ingredients:
1 cup all-purpose flour
2 tablespoons white sugar
2 teaspoons baking powder
1 teaspoon salt
1 egg, beaten
1 1/4 cups milk
2 tablespoons vegetable oil
liquid food coloring

Instructions:

1) In a large bowl, mix flour, sugar, baking powder, and salt.

2) Pour in milk, egg and oil, and mix until smooth.

3) Separate the batter into different bowls depending on how many colors you want to make.  Add food coloring (no more than a few drops is enough!).  

4) Pour the battle onto the heated griddle, using approximately 1/4 cup for each pancake.  Cook until bubbles appear, then flip and cook on the other side until done.


Saturday, August 29, 2015

Mujaddara, or Palestinian Lentils and Rice


No matter what craziness is going on in my personal life, I still love middle eastern food and I like to learn new recipes.  It's always delicious and almost always healthy, and many recipes are naturally vegetarian.  Perfection.  And so is this recipe for mujaddara.  I'm pretty sure I am pronouncing it wrong every time I say it, but I don't even care.  I loved it and I will make it again.  It's quick, easy, cheap, healthy, filling, and reheats great.  What's not to love?

Mujaddara is lentils and rice.  There are thousands of variations on it, of course, but I like that this one has a half and half ratio for rice and lentils.  It doesn't traditionally have carrot, but this recipe does, which I was glad for.  It added a nice color to the dish, along with some more veggies.  Arguably the best part of the dish is the caramelized onions.  Don't skimp on those!  They sweeten up the dish and play nicely with the cumin-spiced rice.  I found myself wishing I had added more onions, which I definitely will next time - and there will be a next time.  I'm going to jack up the onion amount below.

Recipe:

mujaddara, or lentils and rice
from Arabic Zeal
serves 4 -6

Ingredients:
1 cup brown lentils
3 cloves garlic, minced
1 large carrot, chopped finely
1 cup rice
1 teaspoon cumin
1 1/2 teaspoon cumin
1 1/2 teaspoons salt
1/8 teaspoon freshly ground pepper
3 medium onions
2 tablespoons olive oil

Instructions:

1) Wash lentils and put in a large cooking pot with 2 cups cold water.  Add carrots and garlic.  Bring to a boil, lower heat, cover, and simmer for 15 minutes.

2) While lentils cook, start soaking the rice.  Place rice in heat-resistant bowl, cover with boiling water, and stir.  Soak rice for about 15 minutes.

3) Drain rice well and mix with the cooked lentils and 1 1/2 cups hot water.  Add cumin, salt, and pepper.  Cover and simmer until all water is absorbed, about 15 minutes.

4) While rice and lentils cook, halve the onions vertically and slice thinly.  Fry onions in the olive oil until golden brown.

5) Transfer the mujaddara to a platter and top with the fried onions.

Saturday, August 22, 2015

S'Mores Ice Cream Pie

This idea is genius.  Take s'mores, add ice cream, eat dessert.

Of course, like most recipes involving ice cream, this dessert takes a while.  You first make a graham cracker crust.  Then you soften some vanilla ice cream and then stir in some broiled mini marshmallows, chopped graham crackers, and Hershey bar pieces.  That becomes the base of the pie.  Once everything is frozen again, you top the pie with more mini marshmallows and torch them so you get that great toasted marshmallow taste!  Voila: s'more ice cream pie!

Unfortunately due to the time constraints of this pie, I never got to try it.  And I ran out of time before I could add the marshmallow layer.  I put it in the freezer and left for my trip to Colorado.  When I came home, the freezer had malfunctioned and no one got to try my melted pie!  But with a recipe that sounds this good, I will definitely have to try again.  And you should try it too - don't judge this pie based on my melted, half-done photo!  It will keep in the freezer, wrapped, for a week, so make it ahead of time if you must.  Perhaps it could be your Labor Day party contribution (OMG why is summer ending!?)

Recipe:

s'mores ice cream pie
from Two Peas and Their Pod
serves 8

Ingredients:
for pie crust:
1 1/2 cups graham cracker crumbs (or 10 full sheet graham crackers tossed in the food processor)
6 tablespoons unsalted butter, melted
1/4 cup sugar
for the ice cream pie:
3/4 cup mini marshmallows
3 cups vanilla ice cream, softened
1 cup chopped chocolate bars
1/2 cup chopped graham crackers
for the toasted marshmallow topping:
1 1/2 cups mini marshmallows

Ingredients:
1) Preheat oven to 350 degrees.  In a medium bowl, combine graham cracker crumbs, melted butter, and sugar.  Mix until combined.  Press the mixture into a 9-inch pie pan.  Make sure the crust goes up the sides of the pie dish.  You can use the bottom of a measuring cup to press the mixture into the dish.  Bake the pie crust for 8 - 10 minutes.  Remove from oven and let the crust cool completely on a wire cooling rack.

2) While the crust is cooling, place the 3/4 cup of mini marshmallows on a baking sheet that has been lined with a Silpat baking mat.  Turn the oven on broil.  Place the pan under the broiler and broil for 2  minutes or until the marshmallows are slightly toasted.  Make sure you watch the marshmallows closely.  It won't take them long to toast.  Remove marshmallows from the oven and let cool.  When cool, carefully remove marshmallows.  They will be sticky but will peel off the mat.  Use your hands or a spatula.

3) In a large bowl, combine the softened vanilla ice cream, chopped chocolate, chopped graham crackers, and toasted mini marshmallows.  Stir until well combined.  Pour ice cream into graham cracker pie crust.  Smooth with spatula.  Freeze the pie for 3 hours or until the pie is completely solid.

4) When ready to serve, top the pie with remaining mini marshmallows.  Use a culinary torch to toast the tops of the marshmallows.  Be careful because they toast quickly and you want to just barely toast them.  Cut the pie into slices and serve!

Friday, August 21, 2015

Cinnamon French Toast Bites

I think one of the best parts about summer vacation is being able to cook a nice breakfast for myself and my family.  Let's be honest - during the school year, I stay in bed until the last possible moment, and breakfast either does not get eaten at all, or I grab something to take with me.  Leisurely chopping up bread and turning the little cubes into cinnamon-sugar-coated french toast bites?  Unheard of - except for in August.

I've never been a huge french toast lover, but as soon as I saw these on Pinterest, I added them to our breakfast menu.  How cute are they?  Sweet little cubes that you can eat with your hands (or a fork if you're feeling sophisticated); dunk them in maple syrup or eat them plain - they're good enough either way.  I could see this being a huge home run with kids, although the youngest person who ate these was 27 and she loved them too.

I will strongly suggest that you make sure your bread is both thick (Texas toast again!) and kind of stale.  You don't want your cubes to suck up too much of the batter because they won't crisp up as well, and they will flatten out a bit.  You'll notice some of my cubes are more like rectangles; my bread wasn't stale enough.  The cubes get stir-fried, so they really need to have some strength to sustain all the stirring and tossing!  Go grab your stale bread and get cubing.

Recipe:

cinnamon french toast bites
from Recipe Tin Eats
serves 2 - 3

Ingredients:
4 thick slices of slightly stale bread
2 large eggs
1/4 cup milk
pinch of salt
1/4 cup white sugar
1/2 teaspoon cinnamon
3 tablespoons butter, separated
maple syrup to serve

Instructions:

1) Cut the crust off the bread, then cut each piece into 9 equal cubes.

2) Whisk together the eggs, milk and salt in a medium bowl.

3) Combine sugar and cinnamon in a shallow bowl.

4) Melt 1 1/2 tablespoons of butter in a  fry pan over medium high heat.  Don't let the butter brown.

5) Quickly toss half the bread cubes in the egg mixture and use your hands to shake off excess egg mixture.  Place the bread cubes in the fry pan and use a wooden spoon to saute them until browned on all sides - about 2 to 3 minutes.

6) Remove the bread cubes from the fry pan straight into the sugar mixture.  Toss to coat, then remove onto a plate.

7) Repeat steps 4 - 6 with remaining bread cubes.  Serve immediately with maple syrup for dipping.

Thursday, August 20, 2015

Spicy Brazilian Burrito Bowls

There's a new Brazilian place in Leominster, which is a big deal because we never get new places around here.  It's called Comeketo and it's where the old Al Dente used to be, for you locals.  It's awesome!  I have only ordered the same thing every single time - the Brazilian Sensation veggie plate.  It's collard greens saauteed with garlic, rice and beans, fried yucca, and fried plantains (with a glass of fresh-squeezed orange juice too).  It's sooooo good.  It inspired me to try out this recipe for spicy Brazilian burrito bowls, and fry up some plantains of my own!

Imagine a Brazilion burrito, full of beans, rice, fresh herbs and fried plantains.  Now take away the tortilla, serve it in a bowl, and you have this dish.  Delicious, semi-healthy (I mean the plantains are fried but everything else is good!), and only as spicy as you make it.  All of the parts are so great, you could totally just make the beans, or the rice, or the slaw, or the plantains, and serve them as side dishes.  But put them all together, and magic happens.

The rice is actually where the spiciness comes from; it's cooked with salsa, so you can decide whether you're going mild or hot (I went with medium as a compromise!).  The black beans are simply heated up with some cumin and chili powder, so they're simple.  Then there's a garlic cilantro slaw, made with shredded cabbage and lots of fresh herbs in a Greek yogurt base with some lime juice tossed in to brighten things.

And oh the plantains.  They get sliced, fried, then smushed a bit and fried once more.  They end up being slightly sweet and caramelized, and altogether my favorite part of the dish.  Don't skip them (like Rachael!).  They're what make the Brazilian bowls Brazilian!  I fried up 4 of them; I was a little worried that one of them was getting a little too ripe, but it actually ended up being my favorite.  It was the sweetest and softest one.  I guess in that way, they are kind of similar to bananas.  Either way, this meal will be happening again.  If you're more of a burrito than a bowl person, wrap it in a tortilla!  Go portable with dinner!  Go eat it outside; there's a great breeze out there today.

Recipe:

spicy Brazilian burrito bowls
from Pinch of Yum
serves 6

Ingredients:
for the rice:
1 1/2 cups white long grain rice, uncooked
2 1/2 cups water
1 1/2 cups salsa
3 tablespoons tomato paste
2 tablespoons oil of butter
for the black beans:
2 14-ounce cans black beans, rinsed and drained
2 teaspoons chili powder
2 teaspoons cumin
for the garlic cilantro slaw:
1/4 cup oil
1/4 cup water
1/2 cup chopped green onions
1/2 cup cilantro leaves
2 cloves garlic
1/2 teaspoon salt
juice of 2 limes
1/2 cup plain Greek yogurt
4 cups shredded cabbage (or a bag of slaw mix)
for the plantains:
vegetable oil for frying
4 green plantains

Instructions:

1) Make the rice: place the ingredients in a rice cooker and cook until done.  Or, if you don't have a rice cooker like me, bring the water to a boil, then stir in all the other ingredients, cover, and lower the heat to simmer for 15 - 20 minutes.

2) Make the beans: heat the black beans with the spices in a small saucepan until warmed though, adding a little water or oil if necessary.  Keep heat on low to keep warm.

3) Make the slaw: pulse all ingredients except the cabbage in a food processor until mostly smooth. Toss the cabbage with enough sauce to coat; reserve the remaining sauce.

4) Make the fried plantains: peel the plantains and chop them into chunks about 1 inch wide.  Pour enough oil into a heavy skillet to the plantains will be partially covered in oil.  Preheat over medium high heat.  Add the plantains; you should see bubbles if it's hot enough. Fry for a few minutes, then flip and dry for a few minutes more, then transfer to a paper towel-lined plate.  Smash them with the back of a wooden spoon until they break open slightly.  Put back in the oil and fry for another 2 - 3 minutes until golden-brown.  Transfer to a paper towel-lined plate and sprinkle with salt.  They should be crispy on the outside and soft on the inside like french fries.

5) To assemble, serve a scoop of rice, beans and slaw into the bowls.  Add the plantains on top with a few cilantro leaves.  Drizzle with extra sauce.

Wednesday, August 19, 2015

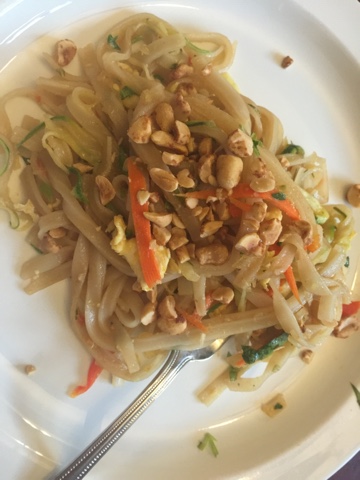
Rainbow Vegetarian Pad Thai with Peanuts and Basil

Boring post alert!

I've been doing a lot of reading about copyright laws lately.  Most of it has been for a class I am taking on creating digital content for use in my teaching, but to be honest there has been a bit of research in my personal life as well for this blog.

A month or so ago, I posted a recipe from another blogger, and for the first time since 2012, I got a request from the original poster to take down the recipe and simply post a link to her blog (which I did).  She wants more traffic on her blog and was concerned that people could use just my site and not visit hers for her recipe.

I understand where she's coming from, but at the same time, isn't that what food blogging is all about?  Sharing good recipes and ideas with other cooks?  I always link to the recipe creator, but I suppose if you're looking for site traffic rather than acknowledgement, then that's not good enough.

I am not the kind of cook who likes or wants to make up my own recipes.  I enjoy cooking more when I know things are going to turn out well in the end!  Today I was reading a post that said that you "have to" create your own recipes if you want to have a food blog (this was posted by the creator of the recipe I have to share today, hence this post).  I disagree.  The point of my blog is not to make me rich or famous, but to keep track of what I have cooked for myself and my family.  And there may be a few other people who follow along :)  I don't think that my blog is very high traffic and doubt that it takes away from the "real bloggers" out there, but I'd also hate to upset anyone who felt like I was stealing their content.

The official recipe copyright rules are tricky.  You can't repost someone's pictures - which I would never do anyway - but technically you can post recipes.  However, to be safe, it's recommended that you change at least 3 ingredients and/or change up the instruction wording a bit, and then still link back to the creator.

So... I know that Lindsay from Pinch of Yum is of the mindset that real food bloggers make their own recipes and don't copy and paste hers.  To be fair, I never copy and paste; I always retype everything because the formatting is wonky otherwise.  I did make a few small changes in this recipe due to availability of ingredients, but mainly went with her absolutely genius creation.  Most of the recipes she posts are great and don't need any tweaking, but I also don't want to make anyone upset.  If you like this recipe, please visit her blog for lots of great recipes (and far more gorgeous photographs than I ever have.)

On to the pad thai!  It was delicious and flavorful and full of vegetables.  I didn't have my zoodle-maker, but I used my mandoline with the julienne blades on and it works perfectly (and saved me a lot of time).  The sauce was amazing even without the chili paste, which I scoured 2 grocery stores for and finally gave up.  Definitely a make-again recipe.  One word of advice - try to devour as much as you can.  I ate the leftovers the next day but they were definitely not as good.

Recipe:

rainbow vegetarian pad thai with peanuts and basil
from Pinch of Yum
serves 4

Ingredients:
for the pad thai:
4 ounces rice noodles
1 zucchini
1 red pepper
half a yellow onion
2 carrots
2 tablespoons oil
1 egg, beaten
1/2 cup chopped peanuts
1/2 cup chopped fresh herbs (I used cilantro and basil)
for the sauce:
3 tablespoons fish sauce
3 tablespoons brown sugar
3 tablespoons chicken or vegetable broth
2 tablespoons white vinegar
1 tablespoon soy sauce (look for gluten-free if you need to)
1 teaspoon chili pasta/sambal oelek (I used some sriracha, about 1/2 teaspoon)

Instructions:

1) Place the uncooked noodles in a bowl of cold water to soak.

2) Spiralize or cut the zucchini, pepper, carrots and onion into noodle-like shapes.

3) Shake up the sauce ingredients in a jar or whisk in a small bowl.

4) Heat a tablespoon of oil over medium-high heat.  Add the veggies and stir fry with tongs for 2 - 3 minutes or until tender-crisp.  Don't overcook or they will get soggy.  Transfer to a dish and set aside.

5) Add another tablespoon of oil to the pan.  Drain the noodles, which should be softened by now.  Add the noodles to the hot pan and stir fry for a minute, tossing with tongs.  Add the sauce and stir fry for another minute or two until the sauce is starting to thicken and stick to the noodles.  Push the noodles aside to make a little room for the egg.  Pour the beaten egg into the pan and let it sit for 30 seconds or so.  Toss everything around with the tongs. The egg mixture will stick to the noodles and everything will start getting sticky.

6) Add in the vegetables, toss together, and remove from heat.  Stir in the peanuts and herbs and serve immediately.

Tuesday, August 18, 2015

Thai Chicken Salad with Orange Peanut Dressing

It's hot today.  So hot that I think I will lounge in air conditioning all day long, only leaving it to swim in the pool.  On days like these, the thought of cooking doesn't even appeal to me.  But alas, we still have to eat.  So salads will just have to suffice.  You know I am not a big salad person, so if I'm sharing one, it's got to be special.  Welcome to the blog, special salad!

Before you get distracted by the fact that the word "chicken" is in the recipe title, don't get too excited.  I don't love the name, because it's not a chicken salad.  It is a salad with chicken on it if you so desire - which I do not, but Kenzie, Nick and Mom marinated and grilled some chicken for theirs.  The salad itself is the winner here.  Romaine lettuce makes up the bulk of it, but there are also carrots, red peppers, edamame, cilantro, sesame seeds - even wonton strips if you can find them (which I couldn't, but those crunchy asian noodles worked as a great replacement and a good texture substitute).

Then there is the dressing, which is so fabulous I'd make it again to spice up a boring salad; it's called orange peanut dressing, which means peanut butter and orange juice and zest are definitely the stars.  Supporting actors include rice vinegar, soy sauce, grated ginger, garlic, and brown sugar.  There's actually no oil in here, so I hereby pronounce this salad dressing healthy.  And amazing.

Mix everything together, and you have the perfect salad for a hot summer dinner.  Or lunch.  Or both if you're lucky enough to have leftovers (add the dressing later if you want it to last overnight!)

Recipe:

Thai chicken salad with orange peanut dressing
from Cooking Classy
serves 4

Ingredients:
for dressing:
1/2 cup peanut butter
2 teaspoon orange zest
1/2 cup freshly squeezed orange juice
2 tablespoons rice vinegar
1 tablespoon low-sodium soy sauce
1 tablespoon peeled and grated ginger
1 tablespoon packed brown sugar
1 small clove garlic
salt to taste
1/4 teaspoon red pepper flakes, more or less to taste
for salad:
1 large head romaine lettuce, chopped
3 carrots, peeled and chopped
1 large red bell pepper, seeded and chopped
1 cup frozen shelled edamame, thawed
2/3 cup salted cashews, roughly chopped
1 cup wonton strips (or crispy asian noodles)
1/4 cup cilantro leaves
1 pound grilled chicken breasts, sliced
white and black sesame seeds for garnish

Instructions:

1) Make the dressing first.  Add all ingredients to a blender, except the red pepper flakes.  Pulse until the ginger and garlic are finely minced.  Season with salt to taste and add red pepper flakes.  Pulse just to stir in.  Pour into an airtight container and chill until ready to serve.

2) Prepare the salad.  Add all salad ingredients to a large salad bowl.  Pour dressing over and toss to evenly coat.  Serve immediately.


Monday, August 17, 2015

Gooey and Cheesy Warm Bacon Dip

I'm excited to share this recipe with you because it's kind of amazing on 3 different levels.

Level one: ease.  The instructions are literally to mix everything together and then bake it.

Level 2: ingredients.  There are 5, and you probably have all of them in your fridge right now.

Level 3: (you knew this was coming) - the taste!  I'll confess that I personally haven't tried this dip due to the bacon, but I have made it 3 times so far, and every time, it has been completely devoured.  After all, the title kind of summarizes how great it is: it's gooey, it's cheesy, it's warm, and there's bacon.  Win win win.

I made this for my best friend's shower, for a birthday party, and for Kenzie to bring to her friend's shower.  Rave reviews all around.  So many people asked for the recipe, and the best part is that I can actually tell them what to do because it's just so simple.  I like to serve it with sliced baguette, but it would go great with crackers or veggies too.  It's just a super easy and yet deliciously impressive dip that should make an appearance at your next party or potluck!

Recipe:

gooey and cheesy warm bacon dip
from Kitchen Meets Girl

Ingredients:
8 ounces cream cheese, softened
2 cups sour cream
1 1/2 cups shredded cheddar cheese
6 slices bacon, cooked and crumbled
1/2 cup sliced green onion

Instructions:

1) Preheat oven to 400 degrees.

2) Combine softened cream cheese, sour cream, cheddar cheese, bacon and green onion.  Spoon mixture into a 1-quart baking dish and bake for 25 - 35 minutes, or until cheese is bubbling and hot.

3) Serve with bread slices, crackers or veggies.

Sunday, August 16, 2015

Texas Burgers

I was a little disappointed when the entire July/August issue of Food Network Magazine was called the ultimate burger issue.  As a vegetarian, I wasn't thrilled!  But my family was pretty pumped.  And even I had to admit that something called Texas burgers was interesting.  There is an article with bunch of mini recipes on how to spice up your burgers to match up with different states (for example, our little MA burger had baked beans on top!)  Kenzie and I thought that the Texas burger sounded great: burgers topped with chili, cheddar cheese, and crushed Fritos! To make it even more Texas-y, the burger buns are swapped out for Texas toast, which I already told you I love.

I made mine with a veggie burger and Kenzie and Nick used beef, and I used my black bean chili  while they used a can, but we all thought Texas burgers are a great idea.  The Fritos add the perfect crunch and the chili and cheese complement each other wonderfully.  These are definitely good for a quick dinner, and they're a great way to use up leftover chili!  Since it's not so much a recipe as it is an idea, I won't post amounts.  The beauty of this is that you can whip up one for yourself, or more for a crowd.  Use as much or as little of each ingredient as you want.

Recipe:

Texas burgers
from July/August issue of Food Network Magazine 

Texas toast + burger + chili + cheddar cheese + Fritos!

Tuesday, August 11, 2015

Slow-Cooked Black Bean Chili

I know that buying dried beans is cheaper than canned.  I know they usually have a better consistency.  I know that in reality it doesn't add many more steps to a recipe.  And yet, I confess to using canned beans 99% of the time.  It's not a bad thing, but it's definitely something I want to be better about.

This recipe helps with that, because it calls for dried beans from the start.  It kind of forces you to buy a bag of beans rather than open the cans!  It adds one step to the process: soak the beans overnight.  That's pretty easy enough -  no complaining necessary.

So besides black beans, this vegetarian chili also has onions, garlic, and baby portabella mushrooms.  Now my whole family hates mushrooms, so I may or may not have told them it was eggplant.  Unfortunately, they figured me out, and both sisters were seen picking out the minuscule mushrooms (I diced them to hide them).  The boys refused to come near it.  So I was left with a giant pot of super delicious chili that only my mother and I would eat.  Luckily Christy came to my rescue and took the leftovers!  She said that her whole family loved it, both on its own and served in tacos.  She finished off the last of it at work.  I was glad that it didn't go to waste, because this is a great little chili.  Plus, is anything greater than using a slow cooker in the summer?  No stove or oven necessary to heat up the whole house!  One more summer cooking tip to keep you out at the pool longer - most of the work for this recipe can be done ahead of time.  This includes the soaking the beans and cutting and cooking the veggies!

Recipe:

slow-cooked black bean chili
from A Couple Cooks
serves 8

Ingredients:
1 pound dried black beans
1 tablespoon olive oil
3 medium yellow onions
3 cloves garlic
1 pound baby portable mushrooms
1 1/2 tablespoons chili powder
1/2 tablespoon chipotle powder
1 teaspoon kosher salt
1 quart vegetable broth
28-ounce can crushed tomatoes
shredded cheddar cheese, sour cream, and sliced scallions for garnish

Instructions:

1) The night before making the chili, rinse and cover the black beans with water in a  bowl.  Soak overnight at room temperature.

2) Prepare the fresh ingredients (this can be done early and kept in the refrigerator).  Dice 3 medium onions, mince 3 cloves garlic, and slice 1 pound of mushrooms.

3) Saute the vegetables (also can be done early, or directly before on the day of making).  On the stove, heat 1 tablespoon of olive oil over medium heat.  Add the onions, garlic and mushrooms.  Stir in chili powder, chipotle powder, and salt.  Sate for 5 minutes until onions are tender.

4) About 10 hours before serving, discard the liquid on the beans and place the beans in a large slow cooker.  Transfer the onion and mushroom mixture to the slow cooker with the beans.  Cover with vegetable broth and crushed tomatoes.  Cook on low 10 - 12 hours.  When ready to serve, garnish with cheese, green onions, and sour cream.

Monday, August 10, 2015

Fluffy French Toast

French toast secret here!  I feel like when I make french toast, it tends to get too mushy and soggy.  But the secret?  Add flour to your batter.  It makes more of a batter that you soak your bread in, and helps to keep the texture absolutely perfect.  On AllRecipes.com, this recipe has over 3,000 ratings, most of which are a perfect 5 stars, so I knew all these cooks were on to something!  It really does come out fluffy (hence the name).  No mushy french toast here.  You'll have to trust me that the flavor was better than this picture.

Rachael was craving french toast a few weeks ago and we happened to have a loaf of Texas toast.  Do you ever buy that?  I never do but I needed it for a recipe (wait for it!).  It really is the perfect french toast bread because it's so thick.  It's probably something to keep in the house if you're a french toast fan.  And add some flour to your batter!

Recipe:

fluffy french toast
from AllRecipes.com
makes 12 slices

Ingredients:
1/4 cup all-purpose flour
1 cup milk
1 pinch salt
3 eggs
1/2 teaspoon ground cinnamon
1 teaspoon vanilla extract
1 tablespoon white sugar
12 thick slices bread

Instructions:

1) Measure flour into a large mixing bowl.  Slowly whisk in the salt, eggs, cinnamon, vanilla, and sugar until smooth.

2) Heat a lightly oiled griddle or frying pan over medium heat.

3) Soak bread slices in mixture until saturated.  Cook bread on each side until golden brown.  Serve hot.

Sunday, August 9, 2015

Beer Battered Tofu Tacos with Mango Salsa

I feel like I have started many posts in this blog with, "please keep reading... just trust me... this sounds weird but it's good...", and here's another one!  I know, tofu isn't everyone's cup of tea.  It's not mine either, to be honest.  I'd much rather have tempeh; it has more texture and substance and feels like you're eating actual food, not marshmallows.

And then this happened.

Are those fish sticks? Nope they're beer battered, fried tofu sticks, and they are officially the best way to eat tofu.  The outside gets crunchy and the inside is soft, just like a fish stick.  In fact I may or may not have tricked a certain 4-year old, who fully believed that she was eating fish.  The rest of my family knew what they were eating, and while they started off very skeptical, they loved it in the end!  This is actually a meal that could turn tofu haters into believers.

More than the tacos themselves, the salsa was a total homerun.  It is not optional and cannot be skipped.  The combination of mango, red onion, fresh corn, and summer tomatoes, mixed with cilantro and lime juice, is absolutely addicting and will most likely be scooped up with tortilla chips long after the tacos are gone.  Just trust me.

Recipe:

beer battered tofu tacos with mango salsa
from Veganosity
serves 8

Ingredients:
1 package of extra firm tofu, pressed to drain
1 cup beer
1 cup all-purpose flour
1 tablespoon Old Bay seasoning
1 1/2 teaspoons finely ground sea salt
pepper to taste
1 cup panic bread crumbs
1 to 2 cups canola oil
1 to 2 mangos, finely diced
1 small red onion, finely diced
2 cobs fresh corn, raw or grilled, based on your liking (I went with raw)
1 jalapeno pepper, seeded and finely chopped
1/2 cup cilantro leaves, coarsely chopped
1 large tomato or 20 cherry tomatoes, finely diced
juice from 1 large or 2 small limes
8 corn or flour tortillas

Instructions:

1) Drain excess oil from the tofu by pressing between two plates lined with paper towels for 20 minutes.  Then slice into 1/2-inch thick pieces approximately 3 inches long and 1 inch wide.

2) While the tofu is pressing, make the salsa.  Peel and cut the flesh off the mango from the core and finely dice.  Put in a medium bowl.  Add the onion, corn, jalapeño, cilantro, tomatoes, lime juice and salt.  Stir well.

3) Then make the fried tofu.  Put the beer, flour, and panko in 3 separate bowls.  Dip the tofu in the beer, then dredge in the flour until evenly covered.  Dip in the beer again, then dredge in the panko until evenly covered.  Place on a plate until all of the tofu is ready to dry.

4) Put a cup or more canola oil in medium skillet, approximately an inch deep, and heat on medium high heat.  When the oil is hot, use tongs to place each piece of tofu in the oil.  Fry until it's golden brown and then use the tongs to flip.  Fry until all sides are golden brown, about 2 minutes per side.  Place on paper towel-lined plate to drain excess oil.

5) To serve, fill a tortilla with 2 or 3 pieces of tofu and top with salsa.  Serve with sour cream if desired.


Saturday, August 8, 2015

Garden Pasta with Lemon Ricotta

This is just a lovely little pasta dish.  There are lots of fresh veggies, bright flavors, and a creamy dollop of lemony ricotta.  What's not to like?

I think I am obsessed with sugar snap peas.  They're just great in everything, including just as snacks. Also, my aunt Tracy apparently loved radishes as snacks.  This is why this dish was the perfect thing for me to make when she came to visit!

And let's talk about the lemon ricotta.  It takes ingredients that are nothing special - lemon zest and ricotta cheese - and somehow combines them into the brightest, freshest, creamiest topping you could put on a pasta dish!  Do not skip it!

Recipe:

garden pasta with lemon ricotta
from the July/August 2015 issue of Food Network Magazine

Ingredients:
kosher salt
12 ounces gemelli pasta
2 cups sugar snap peas, trimmed and sliced into 1-inch pieces (about 8 ounces)
6 tablespoons unsalted butter
2 cloves garlic, chopped
freshly ground pepper
6 radishes, sliced (about 1 cup)
1 small yellow bell pepper, thinly sliced
1/2 cup grated parmesan cheese (about 1 ounce)
2/3 cup chopped mixed fresh herbs (such as parsley, chives, and/or basil)
1 cup ricotta cheese
1 teaspoon finely grated lemon zest

Instructions:

1) Bring a large pot of salted water to a boil.  Add the pasta and cook as the label directs, adding the snap peas during the last 2 minutes.  Reserve 1/2 cup cooking water, then drain the pasta and peas.

2) Meanwhile, heat 3 tablespoons butter in a large skillet over medium-high heat.  Add the garlic, 1/2 teaspoon salt, and a few grinds of pepper.  Cook until the garlic is softened, about 1 minute.  Add the radishes and bell pepper ; cook, stirring, until softened, about 2 minutes.  Add half of the reserved pasta cooking water and and cook until vegetables are tender, 2 more minutes.  Season with salt and pepper.

3) Add the pasta and snap peas to the skillet along with the remaining 3 tablespoons butter, the parmesan, and all but a few tablespoons of the herbs.  Toss to coat, adding enough of the reserved pasta cooking water to loosen/  Season with salt and pepper.

4) Combine the ricotta, 1 tablespoon water, lemon zest and a pinch of salt in a bowl.  Top each serving with the lemon ricotta and the remaining herbs.

Friday, August 7, 2015

Cheesy Party Burgers

This was the one meal I made while we were on my family's vacation in Seabrook, NH.  I had found this recipe on Pinterest and thought it was the coolest idea.  It's a perfect way to serve burgers to a crowd.  Is there any better way to make burgers for 12 people and have them all ready at the exact same time?  Plus don't even get me started on the glaze that gets poured over the top buns.....

I guess maybe calling these burgers is slightly deceiving, because (yay!) there is no meat touching here and the hamburger does not get formed into patties.  Instead, it's cooked on the stove with spices, onion, garlic, and a can of diced tomatoes and green chiles.  Then the burger buns are laid out on a baking sheet, the meat is piled on top, and slices of cheddar go on top of that.  The tops of the buns get added next, and then the glaze, which I think is the coolest part; it's a mixture of butter, brown sugar, Worcestershire sauce, mustard and sesame seeds.  It hardens on the buns and makes them shiny and extra flavorful.

These burgers were a big hit (and yes that includes my veggie burger that I cooked in the corner of the baking dish!).  I think calling them party burgers is a great idea because this would be totally doable at a party.  You could even make them sliders if you wanted to use smaller rolls.  They were a little bit messy so make sure your guests have some silverware and napkins just in case :)

Recipe:

cheesy party burgers
from Kevin and Amanda
makes 12 burgers

Ingredients:
1 pound lean ground beef
1 teaspoon salt
1 teaspoon pepper
1 teaspoon cumin
1 teaspoon mustard powder
1/2 teaspoon smoked paprika
2 cups diced onion (about 1 whole onion)
3 - 4 cloves garlic, minced
1 10-ounce can Ro-Tel diced tomatoes and green chiles, drained
12 slices cheddar cheese
12 dinner rolls or hamburger buns
for glaze:
1/2 cup butter
2 tablespoons brown sugar
1 tablespoon Worcestershire sauce
1 tablespoon mustard
1 tablespoon sesame seeds

Instructions:

1) Preheat oven to 350 degrees. Coat a 9x13" baking dish with nonstick cooking spray.

2) Place a large skillet on the stovetop over high heat.  When the pan is very hot, add the beef and season with salt, pepper, cumin, mustard powder, and paprika.  Add the onion and garlic, and cook, stirring occasionally, until beef is browned and onions are golden.  Stir in drained tomatoes until well combined.

3) Place bottom half of buns in prepared pan.  Top with beef and sliced cheese.  Finish off with the top half of the bun.

4) Mix all the ingredients for the glaze in a saucepan over medium heat until melted, smooth and combined.  Pour over the buns.  Bake at 350 degrees for 25 minutes.


Tuesday, August 4, 2015

Chocolate Banana Crinkle Muffins

Chocolate crinkle cookies are among my favorites.  They're delicious and so pretty with their wrinkly tops, chocolate cookies with powdered sugar coats!  I was obviously pumped to see a chocolate crinkle muffin, with added banana, no less.  They have those same crinkly tops as the cookies, but with granulated sugar rather than powdered.

Kenzie had me make these for her to give to a coworker for her birthday, which I did.  Unfortunately this means I can't tell you how they are.  But they smelled great, and looked great, so I think we can all assume how they came out.

Recipe:

chocolate banana crinkle muffins
yield about 14 muffins

Ingredients:
1 1/2 cups all-purpose flour
1 cup granulated sugar
heaping 1/4 cup unsweetened natural cocoa powder
1 teaspoon baking soda
1/4 teaspoon baking powder
pinch salt
1 large egg
1/3 cup canola or vegetable oil
1/4 cup sour cream or Greek yogurt
1 tablespoon vanilla extract
1 1/2 cups mashed ripe bananas (from about 3 medium/large bananas)
1 cup mini semi-sweet chocolate chips (regular size may be substituted)
about 1 teaspoon granulated sugar for each muffin for sprinkling

Instructions:

1) Preheat oven to 350 degrees.  Spray muffin pans, or grease and flour, or use muffin cup liners.

2) To a large bowl, add the first 6 ingredients, through salt, and whisk to combine.  Set aside.

3) To a medium bowl, add the egg, oil, sour cream, and vanilla, and whisk to combine.

4) Stir in the bananas.  Add the wet ingredients to the dry, and stir until just combined.  Batter is quite thick and prime to having dry bits hiding at the bottom of the bowl.  Make sure everything is incorporated without unnecessarily over-mixing or muffins will be tough.

5) Stir in the chocolate chips until just combined.

6) Turm batter out into prepared pans.  Each muffin cavity should be filled to about 3/4 full.  Sprinkle the top of each muffin generously with sugar, about 1 teaspoon each.  It looks like a lot but some is absorbed and some gets lost to the pan.  

7) Bake 20 - 25 minutes or until muffins are set, does, springy to the touch, and a toothpick inserted into a crack comes out clean.  Don't overbake.  Allow muffins to cool in pan about 10 to 15 minutes, or until they have firmed up and are cool enough to handle.  Muffins will keep airtight at room temperature for up to 1 week, or in the freezer for up to 6 months.  These muffins actually taste better after 2 days.

Monday, August 3, 2015

Blue Cheese Dressing

Just a quick and easy little recipe for you today before I head to the pool to escape the heat and humidity!  On a day like today, maybe you're thinking of a salad for dinner.  After all, turning on the oven or stove would only heat your house up and make you cranky before it's time to eat.  So perhaps tonight should be a salad kind of night, and perhaps you should make your own salad dressing.  If you're a big fan of blue cheese - and I mean big fan because this dressing is super blue cheesy - then this is probably the dressing you should make.  It's quick to stir together and keeps for a few days in the fridge.

I like blue cheese but I don't love it, so I didn't love this dressing, but my mother did.  She loves blue cheese, and this dressing is pretty strong, so she was pumped.  Besides the cheese, there's garlic and fresh parsley, mixed into sour cream, buttermilk, and white wine vinegar.  It's flavored with just a bit or Worcestershire sauce and/or hot sauce, depending on your taste.  The end result is a thick, tangy, creamy dressing that your blue cheese lovers will devour!

Recipe:

blue cheese dressing
from June 2015 Food Network Magazine
makes 2 cups

Ingredients:
3/4 cup crumbled blue cheese, divided
1/2 cup sour cream
1/3 cup buttermilk
1 small garlic clove, smashed
1 tablespoon white wine vinegar
2 - 3 dashes Worcestershire sauce and/or hot sauce
1 tablespoon chopped parsley
salt and pepper

Instructions:

1) Puree 1/2 cup blue cheese, sour cream, buttermilk, garlic, and white wine vinegar in a blender.  Transfer to a bowl.

2) Stir in 1/4 cup more blue cheese, Worcestershire sauce and/or hot sauce, and parsley.  Season with salt and pepper.

Sunday, August 2, 2015

Foolproof Ribs with Barbecue Sauce

What I have learned recently:

  • The heat is bearable when you remember how bad the winter was.
  • There is nothing better than cooking in your own kitchen.  With the air conditioning blasting.  Just don't forget to shut your heat off.
  • If you find a dog you want on social media, you have to move quickly or she will end up in an equally as wonderful home.  Just saying.
  • It's nice to know I'm not alone going through bad stuff.  Other people, good people, have lived to tell the tale.
  • I can still have fun. I can even go to bars (!) with great friends.
  • When making ribs, they should probably take all day cooking low and slow.  But if you want a shortcut, read on.
I was intrigued by a rib shortcut.  Kenzie has a strange obsession with them (in fact she is currently at Fireflies in Marlborough, eating them as I type), but during the hot days of summer, I don't feel like keeping the oven going for hours and hours.  I am always interested in make-ahead recipes, and anything done by Ina Garten, so when I saw this recipe in my Food Network Magazine, I tried it out on the barbecue day I mentioned in my last post.

So what's the shortcut?  Bake them for about 2 hours, and then finish them off on the grill.  That way you get tender ribs, but still get the flavor and grill marks.  Even better is the barbecue sauce, which might be the best recipe I have made so far.  I think I spotted Nick dunking bread in it for days.  Even if you aren't a ran of ribs (ditto), at least make the sauce.  It's a really complex sauce with lots going on.  There's everything from hoisin sauce to honey in there.  Flavor explosion.

The make-ahead part of this recipe is great because you can make the sauce early, and you can even roast the ribs ahead of time too.  This is a recipe that if you wanted, could be spread over 3 days.  It would be perfect for a little barbecue party; all you have to do that day is throw the ribs on the grill for 10 minutes!

The ribs were not as tender as I had wanted, to be honest, but I think I could have left them in the oven for a bit longer.  You are supposed to roast them until they are falling off the bone, and I think I might have jumped the gun.  As far as meats go, this was a mostly painless recipe with minimal touching and cutting, so it's certainly worth another try!

Recipe:

foolproof ribs with barbecue sauce
from Ina Garten in the summer 2015 Food Network Magazine

Ingredients:
for ribs:
5 pounds Danish baby back ribs (4 racks) or St. Louis ribs (2 racks)
kosher salt and freshly ground pepper
for barbecue sauce (makes 1 1/2 quarts):
1/2 tablespoon crushed red pepper flakes
1/2 cup vegetable oil
1 1/2 cups chopped yellow onion (1 large onion)
1 tablespoon minced garlic (3 cloves)
1 cup (10 ounces) tomato paste
1 cup cider vinegar
1 cup honey
1/2 cup Worcestershire sauce
1 cup Dijon mustard
1/2 cup soy sauce
1 cup (8 ounces) hoisin sauce
2 tablespoons chili powder
1 tablespoon ground cumin

Instructions:

1) Make the sauce first: Heat the oil in a large saucepan over low heat.  Add the onions and cook for 10 - 15 minutes until the onions are translucent but not browned.  Add that garlic and cook for one more minute.  Add the tomato paste, vinegar, honey, Worcestershire sauce, mustard, soy sauce, hoisin sauce, chili powder, cumin and pepper flakes.  Bring to a boil, then lower the heat and simmer uncovered for 30 minutes.  Use immediately or pour into a container and refrigerate for several weeks.

2) Preheat the oven to 350 degrees.  Line a sheet pan with aluminum foil.

3) ) Place the ribs on the sheet pan meat-side up and sprinkle them with 2 teaspoons salt and 1 teaspoon pepper.  Pour the barbecue sauce generously on each rack and cover the ribs loosely with aluminum foil,  Bake for 1 1/2 hours for baby backs and 1 3/4 hours for St. Louis ribs, until the meat is very tender when tested with a fork.  As soon as the ribs are out of the oven, spread them generously with additional barbecue sauce.  Grill right away or refrigerate to grill later.

4) About 40 minutes before you want to serve, heat a charcoal grill with a layer of hot coals, or heat a gas grill to medium-high heat.  After the charcoal turns gray, brush the cooking grate with oil to keep the ribs from sticking.  Place the ribs on the grill rib-side down.  Put the lid on top, making sure both vents are open, and grill for 5 minutes.  Turn the ribs meat-side down.  Put the lid back on and grill for another 4 to 5 minutes until nicely browned.  Place on a cutting board and cover tightly with aluminum foil and allow the ribs to rest for 10 minutes.  Cut into ribs and serve hot with extra barbecue sauce on the side.